Amazon Redshift -AWS Blog Info
Amazon Redshift is a fully managed data warehouse service in the cloud. Its datasets range from 100s of gigabytes to a petabyte. The initial process to create a data warehouse is to launch a set of compute resources called nodes, which are organized into groups called cluster. After that you can process your queries.
How to Set Up Amazon Redshift?
Following are the steps to set up Amazon Redshift.
Step 1 − Sign in and launch a Redshift Cluster using the following steps.
Sign in to AWS Management console and use the following link to open Amazon Redshift console − https://console.aws.amazon.
com/redshift/ Select the region where the cluster is to be created using the Region menu on the top right side corner of the screen.
Click the Launch Cluster button.
The Cluster Details page opens. Provide the required details and click the Continue button till the review page.
A confirmation page opens. Click the Close button to finish so that cluster is visible in the Clusters list.
Select the cluster in the list and review the Cluster Status information. The page will show Cluster status.
Step 2 − Configure security group to authorize client connections to the cluster. The authorizing access to Redshift depends on whether the client authorizes an EC2 instance or not.
Follow these steps to security group on EC2-VPC platform.
Open Amazon Redshift Console and click Clusters on the navigation pane.
Select the desired Cluster. Its Configuration tab opens.
Click the Security group.
Once the Security group page opens, click the Inbound tab.
Click the Edit button. Set the fields as shown below and click the Save button.
Type − Custom TCP Rule.
Protocol − TCP.
Port Range − Type the same port number used while launching the cluster. By-default port for Amazon Redshift is 5439.
Source − Select Custom IP, then type 0.0.0.0/0.
Step 3 − Connect to Redshift Cluster.
There are two ways to connect to Redshift Cluster − Directly or via SSL.
Following are the steps to connect directly.
Connect the cluster by using a SQL client tool. It supports SQL client tools that are compatible with PostgreSQL JDBC or ODBC drivers.
Use the following links to download − JDBC https://jdbc.
postgresql.org/ download/postgresql-8.4-703.
jdbc4.jar psqlodbc_08_04_0200.zip or http://ftp.postgresql.org/pub/
odbc/versions/msi/psqlodbc_09_ 00_0101x64.zip for 64 bit machines Use the following steps to get the Connection String.
Open Amazon Redshift Console and select Cluster in the Navigation pane.
Select the cluster of choice and click the Configuration tab.
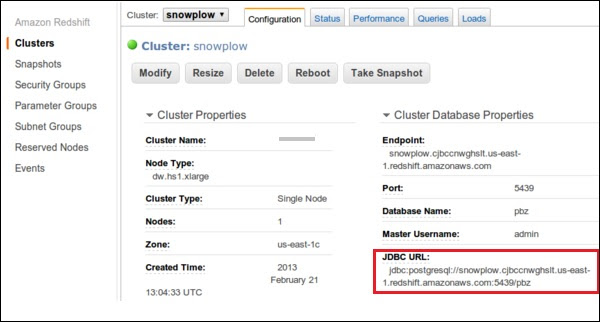
A page opens as shown in the following screenshot with JDBC URL under Cluster Database Properties. Copy the URL.
Use the following steps to connect the Cluster with SQL Workbench/J.
Open SQL Workbench/J.
Select the File and click the Connect window.
Select Create a new connection profile and fill the required details like name, etc.
Click Manage Drivers and Manage Drivers dialog box opens.
Click the Create a new entry button and fill the required details.
Click the folder icon and navigate to the driver location. Finally, click the Open button.
Leave the Classname box and Sample URL box blank. Click OK.
Choose the Driver from the list.
In the URL field, paste the JDBC URL copied.
Enter the username and password to their respective fields.
Select the Autocommit box and click Save profile list.
Features of Amazon Redshift
Following are the features of Amazon Redshift −
Supports VPC − The users can launch Redshift within VPC and control access to the cluster through the virtual networking environment.
Encryption − Data stored in Redshift can be encrypted and configured while creating tables in Redshift.
SSL − SSL encryption is used to encrypt connections between clients and Redshift.
Scalable − With a few simple clicks, the number of nodes can be easily scaled in your Redshift data warehouse as per requirement. It also allows to scale over storage capacity without any loss in performance.
Cost-effective − Amazon Redshift is a cost-effective alternative to traditional data warehousing practices. There are no up-front costs, no long-term commitments and on-demand pricing structure.


Comments
Post a Comment